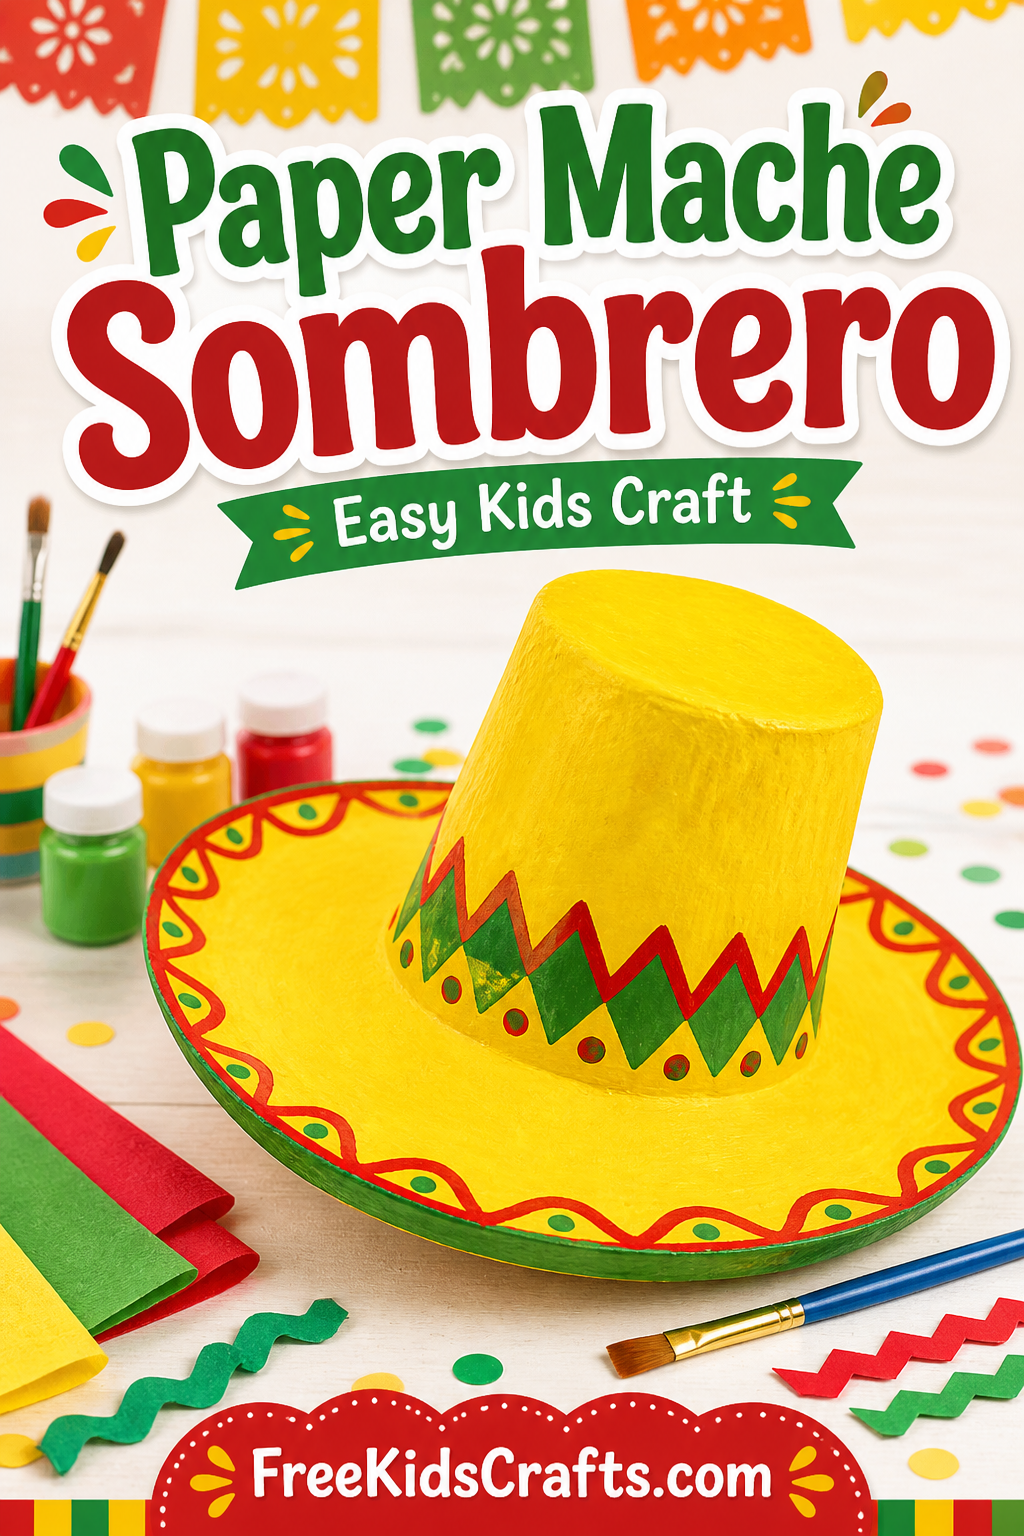
Paper Mache Sombrero
Get into the spirit of Cinco de Mayo with this Paper Mache Sombrero craft. Kids can build their own colorful sombrero using recycled paper, a simple mold, and paint. This project is best for older children with adult help, or it can be done as a classroom group activity over several days since the paper mache needs time to dry.
Supplies
- Newspaper or recycled paper
- Paper mache paste
- Small bucket, plastic flower pot, or similar mold
- Acrylic paint or poster paint
- Paint brushes
- Plastic wrap or aluminum foil
- Petroleum jelly
- Scissors
- Pencil or marker
- Plastic table covering or craft mat
Instructions
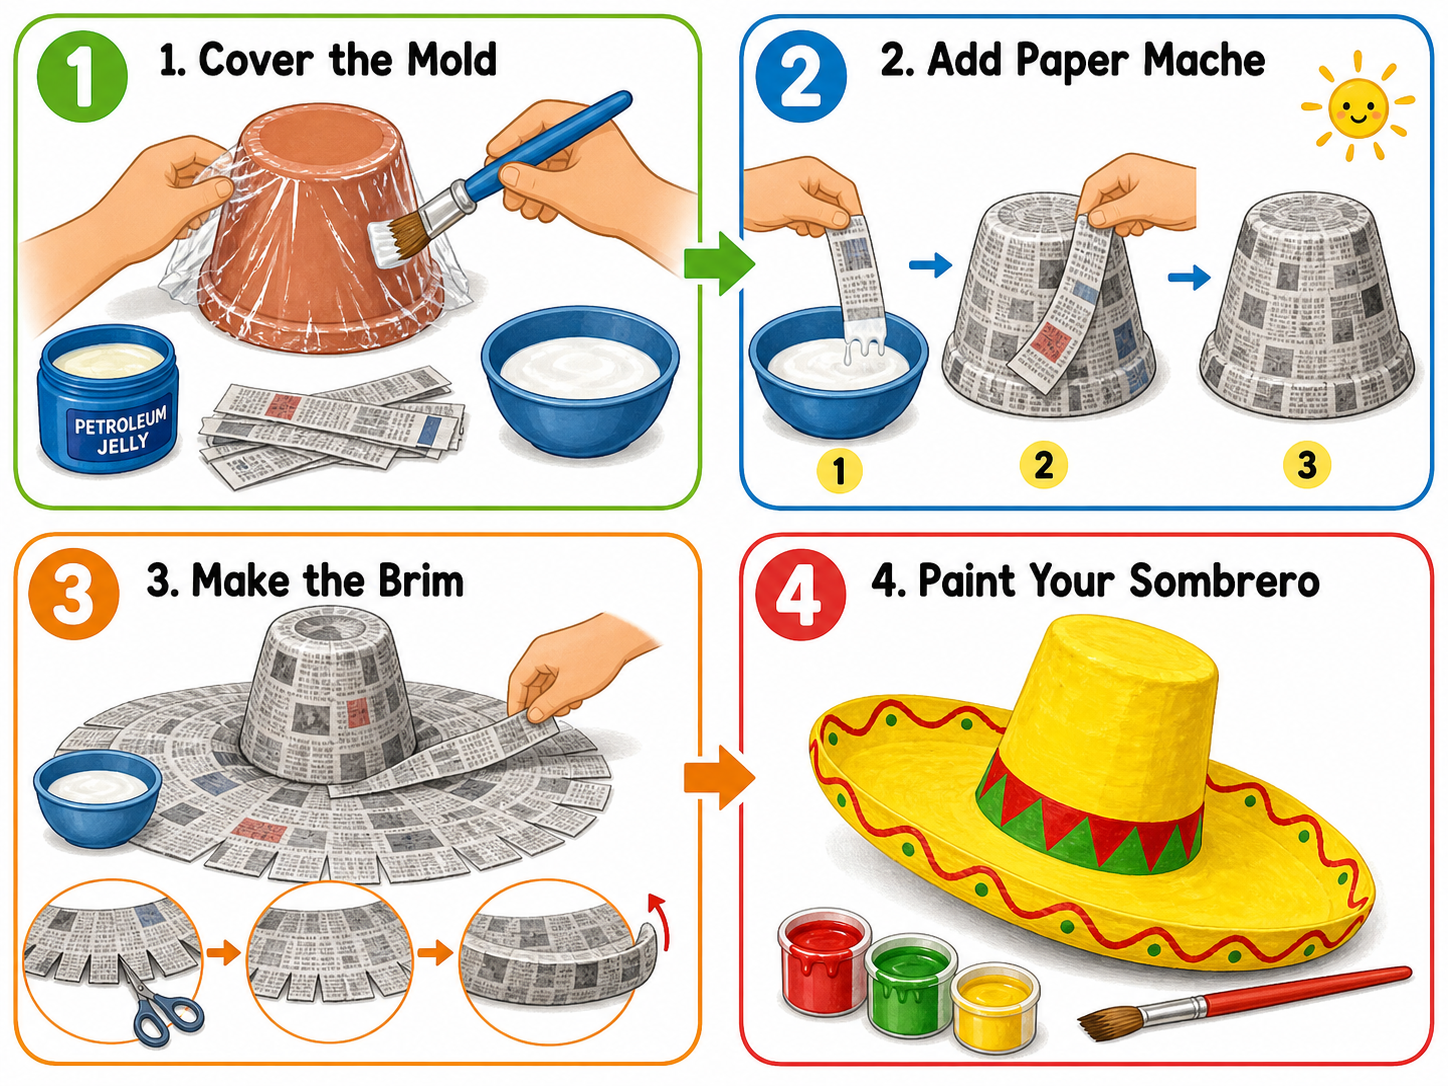
Prepare the Mold
Choose a small bucket, plastic flower pot, or similar container for the top of the sombrero. The mold should be close to the size you want for the crown of the hat.
Rub petroleum jelly over the outside of the mold. Cover the mold with plastic wrap or aluminum foil, leaving extra wrap hanging down around the bottom edge. This will make it easier to remove the dried paper mache later.
Make the Top of the Hat
Dip strips of newspaper or recycled paper into paper mache paste and smooth them over the mold.
Add about 3 layers of paper strips. Let the paper mache dry completely before removing it from the mold.
Once dry, gently pull the paper mache form away from the mold using the extra plastic wrap or foil. Remove the plastic wrap or foil from the inside.
Trim the Hat
Use a pencil or marker to draw a line around the bottom edge of the paper mache crown.
Carefully trim the edge so the hat is the height you want.
Make the Brim
Cover your work area with plastic wrap or a craft mat.
Set the paper mache crown in the center. Add wet paper mache strips around the bottom edge of the crown and outward onto the table covering to form the brim.
Build up the brim with 2 to 3 layers of paper mache strips.
Shape the Sombrero Brim
While the brim is still wet, make small cuts or tears around the outside edge, about 4 inches apart.
Overlap the sides of each cut and press them together so the edge curls upward. Repeat around the brim to create the classic sombrero shape.
Let the whole hat dry completely.
Paint Your Sombrero
Paint the sombrero with bright colors. You can use one main color, then add stripes, dots, zigzags, flowers, or other festive designs.
Be sure to paint the underside of the brim too. If your newspaper print shows through, paint the whole hat white first, let it dry, and then add your final colors.
Craft Tips
This easy Cinco de Mayo craft works best when children take their time and let each paper mache layer dry fully.
For a classroom activity, have students make the paper mache sombreros one day and paint them the next day.
You can also decorate the finished sombrero with yarn, paper flowers, tissue paper, or pom poms.
Patterns, Templates and Printables
No printable template is needed for this craft. Use a small bucket, flower pot, or similar container as the mold for the top of the hat.
Teacher Friendly Educational Extension
Use this Paper Mache Sombrero craft as part of a lesson about Cinco de Mayo, Mexican culture, traditional clothing, and celebrations around the world.
Talk with students about how sombreros were designed with wide brims to help protect people from the sun. Students can compare hats from different cultures and climates, then discuss how clothing can be both practical and decorative.
For a writing activity, have students write a short paragraph describing their sombrero design and why they chose the colors and patterns. For an art extension, display the finished sombreros together as a bright Cinco de Mayo classroom activity.
Supplies
Newspaper or paper for recycling
Papier pache paste
Papier mache mold (flower pot or small bucket)
Acrylic paint or poster paint
Paint brush
Aluminum foil or plastic wrap
Petroleum jelly
Instructions
1. Find a mold
Find a suitable mold for your papier mache hat.
Find a plastic flower pot, small bucket, or similar-shaped container that could fit on your head.
2.You will need to do the following to make it possible to remove the papier mache from its mold:
•Grease the entire exterior of your mold with petroleum jelly.
•Wrap the mold with plastic wrap or aluminum foil. Allow for an extra length of plastic or foil at the base or mouth of your mold.
3. Papier Mache (Hat\'s Top)
Here\'s a basic papier mache tutorial that you can follow. Make about 3 layers of papier mache around your mold.
For a pot or bucket mold, papier mache over the entire area of the mold. Take note to leave an extra length of plastic wrap or aluminum foil at the base of your papier mache.
4. Remove the Papier Mache from the Mold
Once dry, remove your papier from its pot or bucket mold by holding it by the excess length of plastic wrap or aluminum foil and carefully pulling it out from the mold. Once you have pulled out the entire papier mache, remove the foil or plastic wrap inside your papier mache.
5. Trim the Papier Mache
Trim the edges of your papier mache to the desired height for your hat. You may draw a line around your papier mache to make cutting a lot easier.
6. Papier Mache (Hat\'s Brim)
Cover your work area with plastic wrap or with a mat. Mark the desired size and shape of the brim on your plastic wrap. Set your papier mache hat at the center and begin to papier mache around it. First lay down several paper strips around the hat to fix it in place. Slowly build a brim with 2 to 3 layers of papier mache.
7. Molding the Brim
Make a brim with the entire edge curled up:
While the papier mache is still wet, make small slits (or tears) at approximately 4-inch intervals around the edge of the brim.
Overlap the two sides of each slit and press to glue them together.
Repeat for all slits to come up with an upturned brim. This would be a perfect way to make a sombrero!
Don\'t forget to line your mold with plastic wrap.
8. Painting Your Hat
When your papier mache hat has completely dried, paint it with your desired color(s) of acrylic or poster paint. Don\'t forget to paint the bottom of the brim as well.
When using light colors, you may need to prime or paint your hat white before painting with the final color. This hides any print on your papier mache.
This craft is reprinted courtesy of FirstPalette.com where you can find illustrated instructions for this sombrero and other paper mache hats.
Contributor
A free resource for fun and educational kids' crafts, the site features a step-by-step guide for each craft project and includes printable templates, art recipes, and environment-friendly tips for crafting.