


Mini Bi-Plane

August 19th is National Aviation Day. Encourage kids to learn more about the history of aviation as they make this great recycled mini bi-plane craft. The materials are inexpensive and probably close at hand.
Supplies
1 toilet paper tube
Cereal box or some cardboard
Regular masking tape
1 small paper cup
Instructions
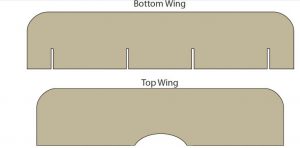
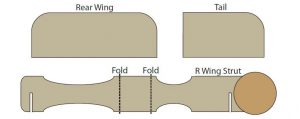
Click on the patterns below and print the wing and parts template for your mini-biplane. Or you can draw your own designs for the wings and tail onto a piece of old cardboard. It’s your plane, so be creative. You could make your wings larger or make the shape different… perhaps dragon or bird wings will do!
Cut out your pieces!
You can glue your template page directly onto some cardboard, like a piece of an old cereal box, and then carefully cut all of the pieces out. Or, you can first cut all of the pieces out from your template, then trace each one onto your cardboard by drawing around them with a pen, pencil or marker, and finally carefully cut each one out.
Add the tail!
Tape the tail section to your rear wing. I like to cut three slots at the end of my TP tube for the tail section to slide into. You could tape your tail section directly onto the TP tube if you like. I also cut out a little cockpit area in the middle section for my pilot to sit in and fly the biplane.
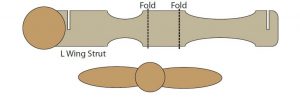
Add your wing struts!
Now take your wing struts and bend them into place, and then slide them onto the lower wing, fitting them into slots you cut out. I put the bigger end of the struts closer to my main body — and now I magically have landing gear. Finally, tape the lower wing and struts to your main body.
Add your top wing!
Next, you need to take your top wing and tape it onto the wing struts. Make any necessary adjustments, and then tape it all together. Your mini-biplane is almost complete!
Build your propeller!
Now it’s time to build the propeller! Take your small paper cup and cut it in half. Glue or tape your propeller piece onto the bottom of your cup. I trimmed my cup to fit right onto the front of my TP tube.
Add your propeller!
Finish up your plane by taping on your propeller to the front of your TP tube and…VOILÁ! — a cool mini biplane to fly around the house!
At this point you can decorate your mini-biplane. Maybe your mini-biplane needs some racing stripes or some thunderbolts… the sky is the limit! Have fun!
Patterns, Templates and Printables
Click on a pattern to open it in a new window to print
Contributor
![]()
LooLeDo.com
Fun Kids Crafts, Science Projects and More. Step-by-step instructions for hundreds of incredibly cool crafts and science projects that can be built from everyday household objects.
Supplies
Instructions
Contributor
Want to have some creative family time? Print out our SudBudz® Masks and get crafty with the kiddos! More than just a typical Fizzy Bath Ball, SudPrize® is a first ever line of skin-loving and natural bath products that make bath time Fun for Kids and Easy for Moms. A Free companion App, SudBudz® engages your children into an immersive world of special and unique characters called SudBudz®.

excelente muy agradecida por permitirme aprender y por los moldes
Translation “excellent, very grateful for allowing me to learn and for the molds”