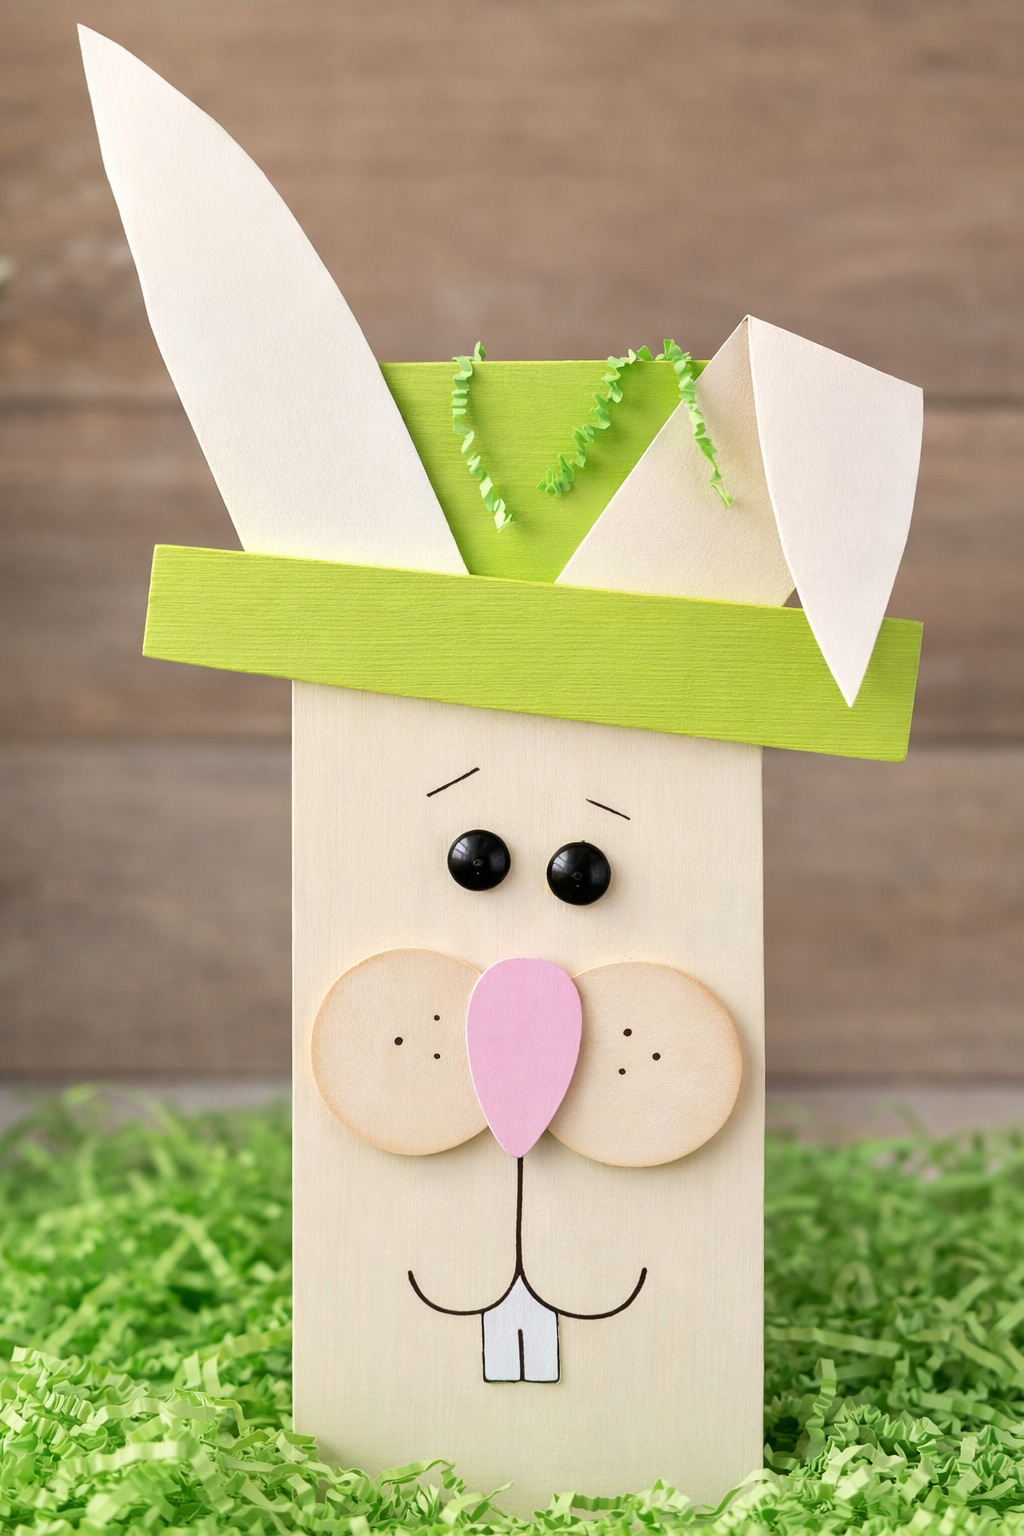
Wooden Easter Bunny Decoration
This Wooden Easter Bunny Decoration is a cute spring craft that can be made from a pre-cut wood panel or leftover wood scraps from another project. It is a fun way to create cheerful Easter decor for a shelf, entry table, mantel, or even the front porch.
Supplies
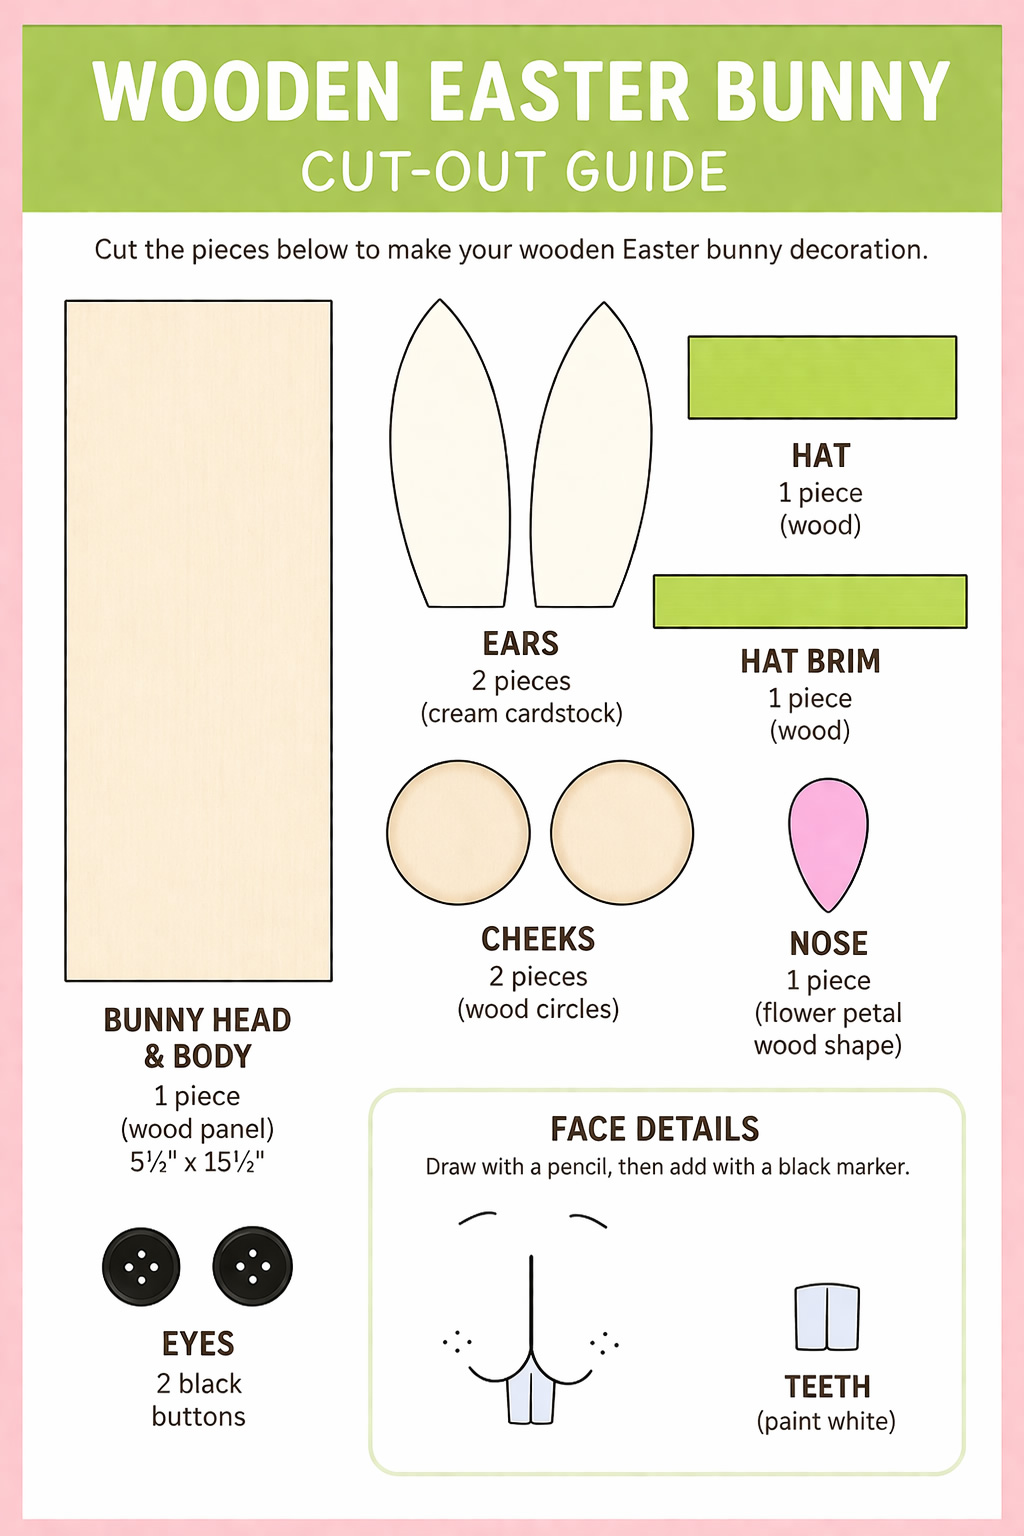
- Wood panel, about 5 1/2 x 15 1/2 inches
- Small piece of wood for the hat brim
- Glue dots or strong craft adhesive
- Double-sided adhesive sheets
- Paint in light cream, green, pink, and white
- 2 black buttons
- Cream cardstock, 8 1/2 x 11 inches
- 2 wood circles
- 1 flower petal wood shape
- Black marker
- Pencil
- Scissors
- Distress ink and sponge, optional
Instructions
- Paint the bunny face and the two wood circles with a light cream paint. Let them dry completely.
- Paint the hat and brim in the color of your choice. A soft spring green works well for an Easter look.
- Paint the flower petal wood shape pink to make the bunny’s nose.
- Once the two circles are dry, lightly add distress ink around the edges if you want a little extra dimension.
- Fold the cream cardstock in half lengthwise so it measures about 4 1/4 x 11 inches. Draw and cut out two bunny ears.
- Attach the ears near the top of the bunny head so the bottoms will be covered by the hat brim.
- Apply adhesive to the hat brim and press it firmly over the ears.
- Attach the two black buttons for the bunny’s eyes.
- Add adhesive to the two painted circles and press them onto the bunny’s face for the cheeks.
- Glue the pink nose in place between the cheeks.
- Lightly sketch the eyebrows, mouth, and teeth with pencil first. When you are happy with the placement, trace over the lines with a black marker.
- Paint the teeth white and allow them to dry.
Ways to Make It Your Own
You can easily customize this wooden Easter bunny decoration to match your home or classroom style.
- Use fabric or scrapbook paper for the ears
- Add flowers to the hat
- Paint the hat in plaid, polka dots, or stripes
- Attach a hanger to the back for a door decoration
- Use a larger pallet board to make a porch sign
- Swap the wood panel for sturdy recycled cardboard for a lighter version
Patterns, Templates and Printables
You can freehand the bunny ears, cheeks, and face details, or create a simple printable template before starting. This makes the project even easier for classroom activities or group crafting.
Teacher Friendly Educational Extension
This Easter craft can also work well as a classroom activity or homeschool art project.
Students can practice:
- Following step-by-step directions
- Painting and fine motor skills
- Shape recognition using circles, petals, and ear shapes
- Creative expression by designing their own bunny colors and patterns
For a fun writing extension, ask children to name their bunny and write one or two sentences about where it lives or how it celebrates spring.
Supplies
Glue Dots® Advanced Strength Dispenser
Glue Dots® Advanced Strength Double-Sided Sheets
Wood Panel – Mine is 5 ½” X 15 ½” (you can purchase already cut panels at Michael’s or Hobby Lobby or have them cut to size at your local hardware store)
Wood for Brim
Paint – I used Deco Art Americana – Citron Green, Poodleskirt Pink, Buttermilk and White
2 Black buttons
1 – 8 ½” X 11” cardstock – Cream (ears)Hippity Hoppity Happity Easter Bunny
Wood Shapes – 2 Circles and 1 Flower Petal
Black Marker
Scissors
Pencil
Distress Ink and sponge (optional)
Instructions
Paint hat and brim using color of choice, I used Citron Green.Hippity Hoppity Happity Easter Bunny
Paint bunny and two circles using Buttermilk.
Paint nose using Poodleskirt Pink.
Once the two circles are dry, add a bit of distress ink around the outside edges.
Using an 8 ½” X 11” piece of cream cardstock fold in half, so it should be 4 ¼” X 11”. Draw ears or freehand cut ears out.
Adhere ears at the brim line using the Advanced Strength dispenser.
Cut the Advanced Strength Double-Sided sheets to size and adhere to the brim of the hat. Press the brim of the hat firmly over the ears on the head of the bunny.Hippity Hoppity Happity Easter Bunny
Use an Advanced Strength dispenser to adhere the buttons (bunny’s eyes) on to its face. Press each button firmly in place for a strong secure hold.
Cut the Advanced Strength Double-Sided sheets to size for the circles. Press the adhesive firmly on to the adhesive, then press the circles firmly in place on bunny’s face.
Adhere nose using the Advanced Strength dispenser.Hippity Hoppity Happity Easter Bunny
Sketch out eye brows, mouth and teeth with a pencil and then go over with marker once satisfied.
Paint teeth white and let dry.
**Options to make it your own. You can use material for the ears. Add flowers to the hat. Paint the hat plaid. You can add a hanger on back so you can hang or just let it sit on a shelf. Use an old pallet piece for the body to stand outside your front door. So many ways to make this your own.
Don't be afraid to substitute other materials like a recycled cardboard instead of the wood panel.
Contributor
Glue Dots® Adhesives – The New Way to Glue™! Consumers have found endless uses for Glue Dots around the home, school, and office. Glue Dots adhesives are acid-free, lignin-free, non-toxic, easy-to-use, and require no dry time. Glue Dots adhesives provide a strong, versatile and safe adhesive solution that can be used by the entire family. Use Glue Dots adhesives for school projects, home décor, and around the office – the possibilities are endless!