


Q-Tip Skeleton
Q-Tips make great bones for this Halloween Skeleton. The kids will have a great time making this project.
Supplies
18 Q-tips
Black cardstock or construction paper
White paper
Black marker
Scissors
White glue
Instructions
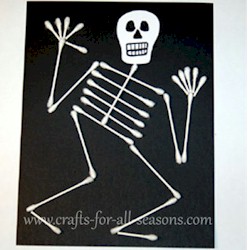
1. Begin by gluing 6 whole Q-tips on the black cardstock for the skeleton’s ribs.
2. Glue 1 Q-tip perpendicular over the ribs to act as the backbone. Have the Q-tip lie flush with the last rib, but poke up longer than the top rib, to act as the neck bone.
3. Draw a skull on the white paper with a black marker, and cut it out.
4. Glue the skull on the paper above and touching the neck bone.
5. Glue 4 whole Q-tips for the arm joints and leg joints, as shown in the finished photo below.
6. Cut 6 whole Q-tips in half, or make them even shorter if you like (like I did). These are smaller bones that can be used as the 10 fingers, and 2 to be the feet. Glue them in place.
7. Hang on your front door for the Trick-or-Treaters!
This project is reproduced courtesy of Crafts For All Seasons where you will find crafts to fit every season.
Contributor
Want to have some creative family time? Print out our SudBudz® Masks and get crafty with the kiddos! More than just a typical Fizzy Bath Ball, SudPrize® is a first ever line of skin-loving and natural bath products that make bath time Fun for Kids and Easy for Moms. A Free companion App, SudBudz® engages your children into an immersive world of special and unique characters called SudBudz®.
0 thoughts on “Q-Tip Skeleton”