


Beaded Safety Pin Angel Ornaments
Angel Crafts, Bead Crafts, Bible Crafts, Christmas Crafts, Decorating Crafts, Gifts to Make, parents, Teen Crafts
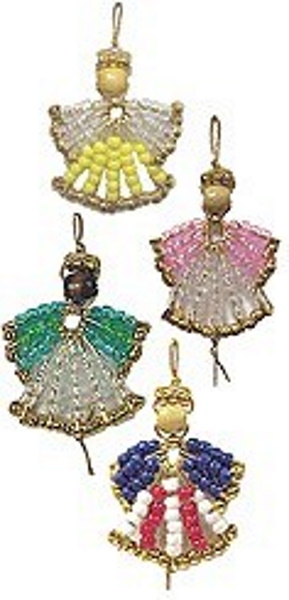
These Beaded Safety Pin Angel Ornaments will make your tree sparkle. Be sure to have the kids make lots of them and create a theme for your Christmas tree. They also make wonderful gifts to give to those special people in your life.
Trivia:
Walter Hunt invented the safety pin in 1849 and sold the idea outright for $400. Source: Lemelson MIT – Walter Hunt
Supplies
- 5 Safety Pins, Size 4
- 6 Safety Pins, Size 2
- 49 Red, White & Blue Pony Beads or Translucent Pony Beads
- 20 Metallic Pony Beads
- White Glue
- 30″ Metallic Cord
- One 16mm Wooden Barrel Bead
Instructions
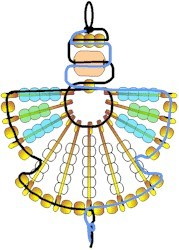
- Cut cord to 30″. Stiffen ends with white glue. Let dry. Fold in half and tie a knot 1/2″ below the fold.
- Choose your bead colors for the wings. Open six size 2 safety pins and string on the beads. Four safety pins should have four beads each. Two safety pins should have three beads each. See diagram at right. Close the pins.
- Choose your bead colors for the body. Open five size 4 safety pins and string on the beads. Two safety pins should have four beads each. Two safety pins should have five beads each. One safety pin should have six beads. See diagram below. Close the pins.
- These written directions for weaving the pins and beads may seem complicated. Just follow along using the diagram below+.
- String three metallic pony beads on one end. String the other cord end through the same three beads in the opposite direction. String one barrel bead on one cord. String the other cord end through the same bead in the opposite direction. String one metallic pony bead on one end. String the other cord end through the same bead in the opposite direction. Tighten cord, pulling both ends evenly and firmly.
- String the safety pins in the order shown above on one cord. String that cord through the metallic neck bead again forming a loop that holds the safety pins. String that cord down through the first safety pin of the wing. Pull it through the opening on the pin head. String on a metallic bead, then through the next wing safety pin head. String on a metallic bead, then through the third wing safety pin. String on a metallic bead, then through the last two beads on the first safety pin of the body. String on a metallic bead then through the head of the first body pin. String on two metallic beads, then through the next body safety pin head. String on two metallic beads, then through the third body safety pin head.
- String the other cord through the last safety pin on the wing then through the head. Continue adding gold beads and stringing through the heads as with the first cord. Tie off under middle safety pin. Add a dab of glue on the knot. Let dry and trim.
Patterns, Templates and Printables
Click on a pattern to open it in a new window to print
![]()


Supplies
Instructions
Patterns, Templates and Printables
Click on a pattern to open it in a new window

Contributor

These projects are created by Terri, Betty, Jamie or one of the talented staff members at MakingFriends.com. They have been created exclusively for publication on FreeKidsCrafts.com with supplies you'll be able to find around your house.
0 thoughts on “Beaded Safety Pin Angel Ornaments”