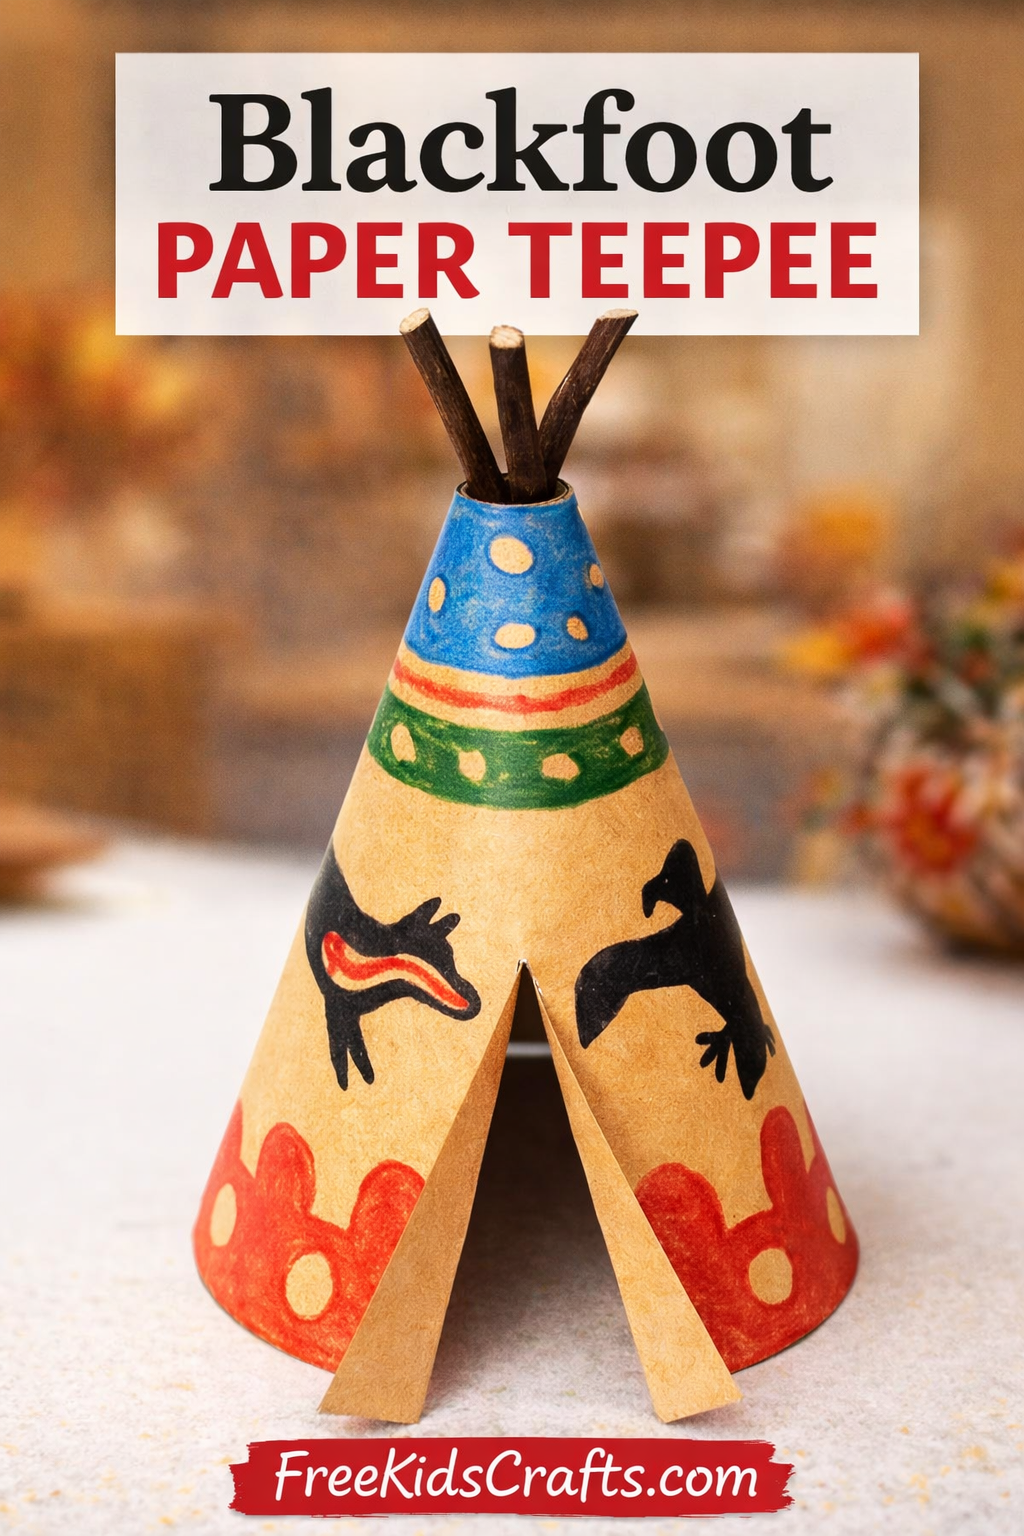
Blackfoot Paper Teepee
Bring a little history and creativity to your Thanksgiving crafts with this Blackfoot Paper Teepee. Kids can color and assemble their own paper teepee using simple supplies, then display it as part of a festive centerpiece or classroom decoration. Tipis were traditional homes used by many Indigenous peoples of the Plains, including the Blackfoot Confederacy. The Blackfoot people have long used tipis, known in Blackfoot as nitoyiss, as homes and lodges.
Supplies
- Brown A4 or US Letter size cardstock
- Colored pencils, crayons, or markers
- Scissors
- Glue
- Ruler
- 3 sticks, skewers, or small twigs
- Rubber band
- Scotch tape
- Scoring tool such as a blunt plastic knife or an empty ballpoint pen
Instructions
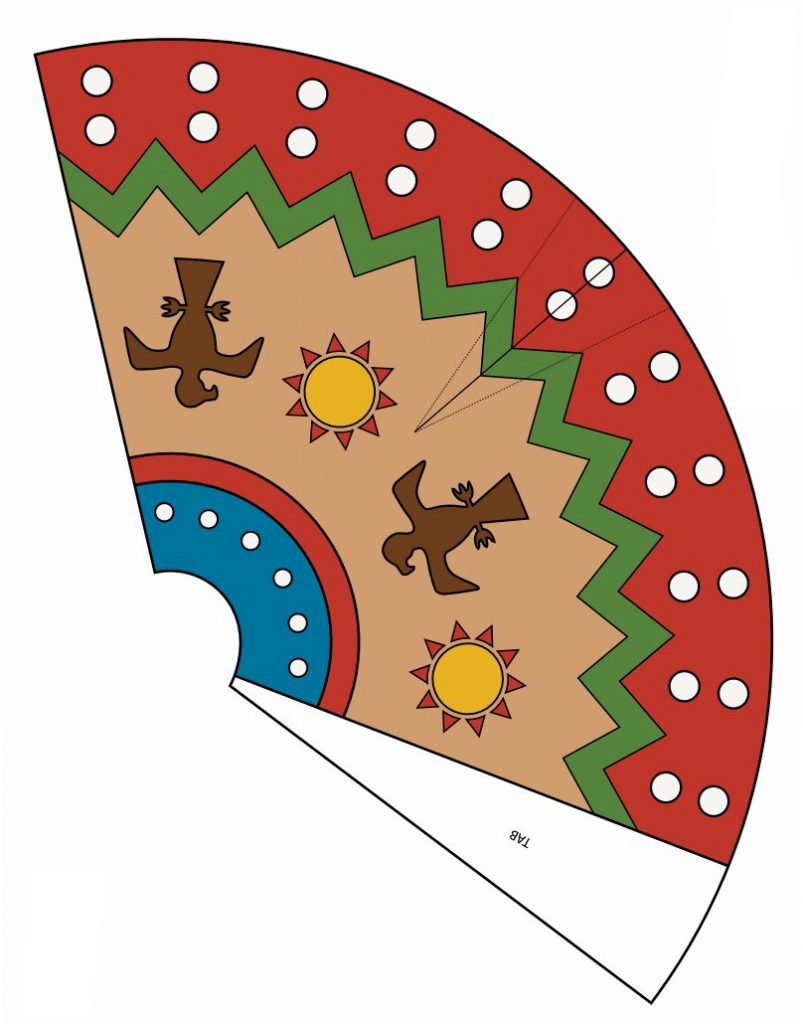
- Print the teepee template on brown A4 or US Letter size cardstock.
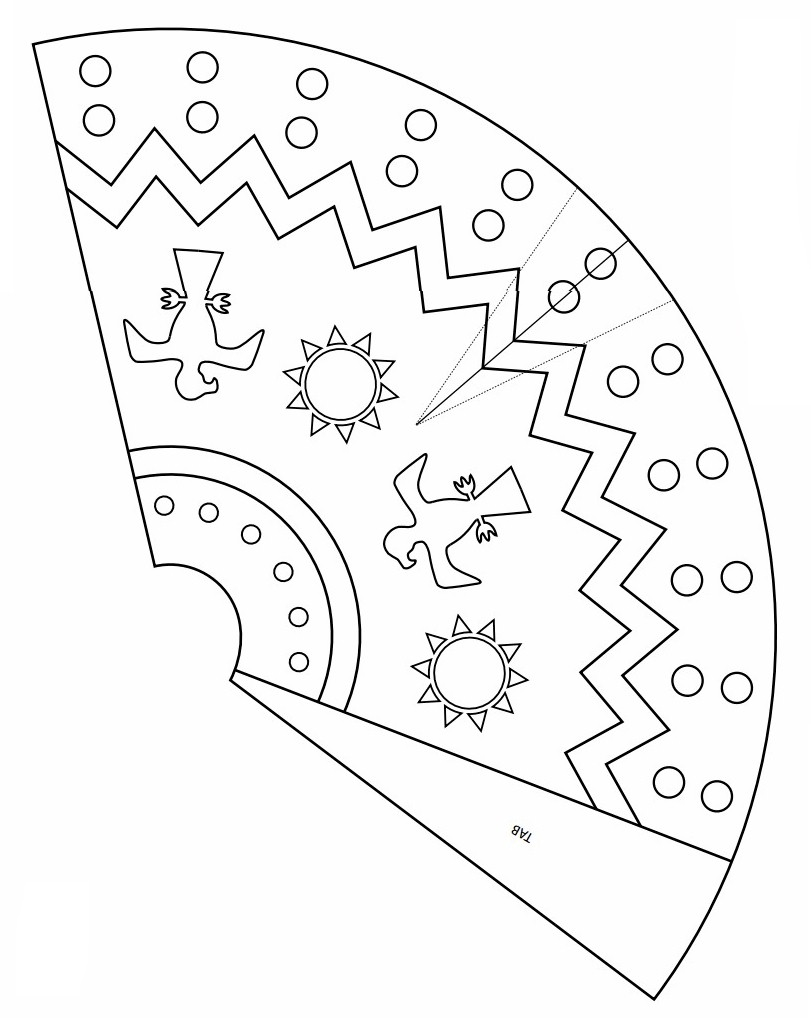
- Decorate the teepee with crayons, markers, or colored pencils. Kids can create their own designs or use simple nature-inspired patterns.
- If you would like to add themed details, try these ideas inspired by traditional painted tipi art. A dark band near the bottom can represent the earth. Rounded or pointed shapes above it can suggest hills or mountains. The upper section can include stars or sky designs. Animal images were also sometimes used in painted tipi designs and could carry special meaning.
- Score both sides of the door flap if you are using heavy cardstock. Place a ruler along each fold line and gently press the scoring tool down the line. This will make folding easier.
- Cut along the center line of the door.
- Fold the door flaps outward along the scored lines.
- Apply glue along the tab.
- Bring the opposite edge around and glue it to the tab to form a cone shape.
- Cut three sticks, skewers, or twigs to about 6 to 7 inches long.
- Loosely bind the sticks together with a rubber band about 1 inch from one end.
- Place the tripod inside the paper teepee so the bound end peeks out through the top hole.
- Tape the bottom ends of the sticks to the inside of the teepee to hold everything in place.
Fun Facts
Tipis were designed to be practical homes for Plains peoples. Their cone shape helped them stand up well in windy weather, and the structure could be taken down and moved when families traveled.
The Blackfoot Confederacy includes the Siksika, Kainai, and Piikani Nations.
Patterns, Templates and Printables
Click on a pattern to open it in a new window.
Teacher Friendly Educational Extension
This printable works well as a classroom activity during Thanksgiving or Native American heritage studies. Use it as an opportunity to talk about homes from different cultures and regions, and how people build shelters that fit their environment.
You can also invite children to compare a teepee with other types of homes around the world. Ask questions such as why portability was important, what materials were available on the Plains, and how art can tell stories about a family or community.
Keep the conversation respectful and focused on learning about real cultures, both past and present.
Supplies
Brown A4 or US Letter size card stock
Colored pencils, crayons, or markers
Scissors
Glue
Ruler
Three sticks, skewers, or twigs
Rubber band
Scotch tape
Scoring tool (e.g. blunt plastic knife, spent ballpoint pen)
Instructions
Print out the teepee template on brown A4 or Letter size card stock.
Decorate the teepee using colored pencils, crayons, or markers. Decorate as you like or draw inspiration from how the Native American people decorated their teepees. Check out these resources for some useful info:
The bottom part of the teepee represents the earth. It is typically decorated with a dark-colored band. Curved mounds springing from the top edge of the band represent hills while pointed ones are mountains.
The top section represents the sky. It is often filled with round-shaped stars.
Animals are usually found in the teepee's middle area. These are said to be the teepee owner's spirt helpers.
Score both sides of the door. This step is necessary if you printed out the template in heavy or thick card stock. Scoring makes folding the door a lot easier. Find a scoring tool such as a blunt plastic knife or a spent ballpoint pen. Place the edge of a ruler on one of side of the teepee's triangular door. With the ruler to guide the tool, score along the entire line. Do not score too hard as this may tear the paper. Repeat with the door's opposite side.
Cut along the door's middle line.
Fold out the door flaps along the pair of scored lines.
Apply glue along the entire tab area.
Glue the tab behind the teepee's opposite edge, forming a cone shape.
Cut three sticks, skewers, or twigs to a length of about 6 to 7 inches.
Bind them together loosely with a rubber band about an inch from one end.
Place the tripod inside the teepee, with its bound end peeking through the top hole.
Tape the bottom end of each stick onto the inside of the teepee.
Patterns, Templates and Printables
Click on a pattern to open it in a new window


Other Images
Click on an image to open it in a new window


Contributor
A free resource for fun and educational kids' crafts, the site features a step-by-step guide for each craft project and includes printable templates, art recipes, and environment-friendly tips for crafting.