


Fabric Flower Fairy
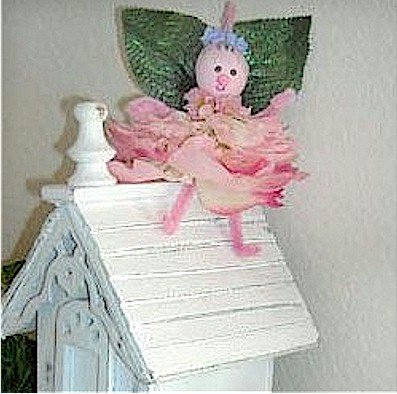
Teens can decorate anything with a Fabric Flower Fairy; their rooms, gifts, backpacks etc. Hang them anywhere. They are fun to make and a great craft project.
Supplies
Supplies to make two fairies:
2 Medium-sized silk flowers in different colors with at least 8 layers of petals each
2 Bunches of small silk flowers to coordinate with each large flower
2 Wood 1″ dowel caps by Lara’s Crafts
2 5mm pink pom-poms by Westrim Crafts
4 Pink 12″ chenille stems (pipe cleaners)
4 Green silk leaves
Delta Ceramcoat Acrylic Paint in Touch o Pink
Sharpie fine point permanent markers in hot pink, brown and blue
Liquitex Liquigems acrylic paint in Opal
Paint brush
Aleene’s Clear Gel Tacky Glue or low temp glue gun
Wire cutters
Pencil
Small scissors
Instructions
Place a wood dowel cap (to make a fairy head) on the eraser end of a pencil and paint it skin color. Stand in a cup to let dry.
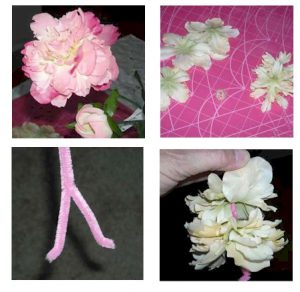
Pull 1 large flower from its stem and take it completely apart.
The flower in the example has 9 layers and starts large at the bottom and gets smaller near the top of the flower. Separate the different sizes.
Take one pink chenille stem and fold it in half. Bend the legs slightly and fold up ½” for the feet.
Using the hole in the center of each flower layer, slide the largest layer upside down over the chenille stem.
Slide it down about 2/3 of the way leaving the legs showing.
Place a dab of glue around the hole of the petals. Some petals may also need to be glued down.
Continue sliding the next size layer of petals down onto the stem and gluing in place. Leave just about 1/8″ between layers and stagger the petals so they don’t all line up with each other.
Let this dry about an hour or two.
With the wire cutters, cut off 1″ of the folded end of the chenille stem. Bend over the cut end ¾” in preparation for the head.
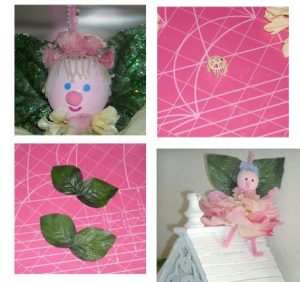
Using the Sharpie markers, make blue or brown eyes and a hot pink mouth.
Place a tiny dab of glue for the nose and cover with a tiny pink pom-pom.
Take another chenille stem and fold into thirds and cut at each fold.
Two of these will be arms. Set aside for later.
Cut the third piece of chenille stem in half. These two short pieces will be for the hangers.
With the small scissors, trim the chenille very short on both pieces.
Set one piece aside for the other fairy. Mold one end to the top of the head and glue in place.
When this is completely dry, slide the plastic center from the flower down over the chenille stem and glue onto the head to form the hair. Let dry.
Place some glue into the hole in the bottom of the head and glue onto the folded chenille stem left for the head.
Take the remaining two cut pieces of chenille stems for the arms and place some glue at one end of each.
Tuck in the arms just underneath a couple of the top petal layers. Place them as close to the body as they will go. Let this dry completely.
Trim ¾” off both arms and turn the ends up for the hands. Slightly bend the arms and legs.
Cut the stems off the tiny flowers fairly close to the bottom of each flower.
Glue 3 or 4 to the top area of the head around the hanger for the fairy’s headdress. Glue 3 or 4 around the neck for her collar. Let dry.
Brush Liquigems paint on all the flower petals.
Cut the stem completely off 2 green silk leaves. Glue these together slightly overlapping them at the stem area to form the fairy wings. When completely dry, paint the wings with Liquigems paint. Let paint dry.
Glue the wings to the fairy’s back.
Curve the hanger over a pencil to form a hook for hanging.
Repeat the necessary steps for fairy #2.
contributor
![]()
The Artful Crafter
After spending years as first a teacher and then as a VP of Finance for a major corporation, I took early retirement to devote time to my true passion, crafting. I own a small craft store, do custom orders and run The Artful Crafter website.
Supplies
Instructions
Contributor
Want to have some creative family time? Print out our SudBudz® Masks and get crafty with the kiddos! More than just a typical Fizzy Bath Ball, SudPrize® is a first ever line of skin-loving and natural bath products that make bath time Fun for Kids and Easy for Moms. A Free companion App, SudBudz® engages your children into an immersive world of special and unique characters called SudBudz®.
0 thoughts on “Fabric Flower Fairy”