


Printable Roman Helmets
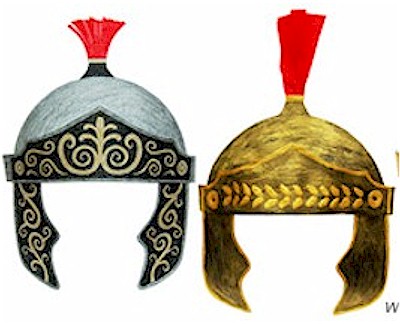
The kids will have a blast making these Printable Roman Helmets and reenacting that time as they study the history of the era. These helmets also make a great starting point for a fun Halloween costume.
Supplies
A4 or Letter size printable cardstock
Crayons or any water-based paint (e.g. poster
paint, tempera, acrylic paint)
Scissors
Glue
Gold glitter glue or puffy paint (optional)
Plastic gems (optional)
Instructions
Choose from any of these Roman Imperial Helmet templates. For this craft tutorial, we chose the plain template to demonstrate the basic steps for making a paper helmet and the various ways you can decorate it.
If you prefer a quicker and simpler option, you can print out the ready-to-color template or the colored helmet template.
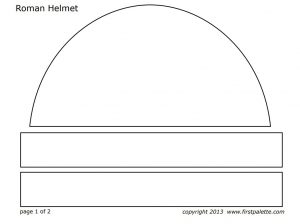
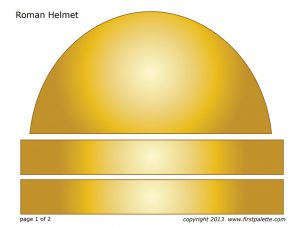
The first page consists of the main helmet piece and a pair of long straight bands. Paint the pieces with a metallic color such as gold or silver tempera, poster, or acrylic paint. Instead of painting, you can can also color the pieces with crayons or oil pastels.
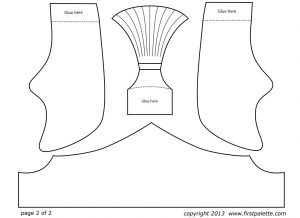
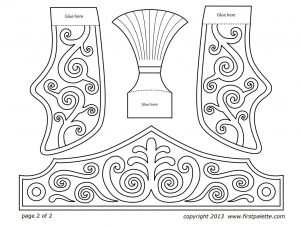
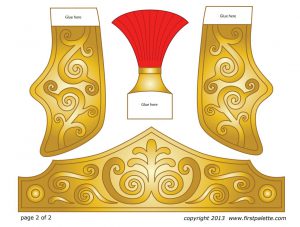
The second page includes a crown-like visor, a pair of curvy cheek guards, and a crest. Paint all of these with gold or silver paint except for the top part of the crest. Paint the fan-like portion of the crest red. Also notice that the cheek guards and the crest have tabs labeled with the words “Glue here”. Leave these tabs unpainted.
Once the paint dries, cut out all the template pieces.
Take the crest. Cut slits following the inside lines to create fringes.
Apply glue on the crest’s tab. Glue the tab behind the top center portion of the main helmet piece.
Glue the pair of cheek guards onto the bottom corners of the helmet. The top tab of each cheek guard should be positioned behind one bottom corner of the helmet.
Next, glue one straight band behind the helmet’s bottom left corner. Align the band’s bottom edge with those of the helmet’s.
Glue the second straight band onto the helmet’s bottom right corner.
Glue each corner of the visor close to the junction between the straight band and the helmet. This will cause the visor to slightly pop out, breaking the flatness of the helmet.
This step completes a basic Roman helmet. To wear the helmet, simply join the bands together to fit around your head. In case you want to embellish the helmet, continue with the steps below.
Use glitter glue, puffy paint, or colored glue to decorate the helmet with embossed lines. Scrolls, curvy lines, leaves, flowers, and dots are elements often found in Roman helmets.
You can also glue on plastic gems, sequins, or gem-style stickers for added texture.
Glue on a pair of large plastic gems, buttons, or round paper cut-outs to create the “rivets” on each corner of the visor. You can also draw the rivets using glitter glue, puffy paint, or colored glue.
Once everything is dry, glue or staple the ends of the bands together to fit around your head.
For more ideas on decorating your helmet go to First Palette for step by step directions.
Patterns, Templates and Printables
Click on a pattern to open it in a new window to print
Contributor
![]()
First Palette.com
A free resource for fun and educational kids’ crafts, the site features a step-by-step guide for each craft project and includes printable templates, art recipes, and environment-friendly tips for crafting.
Supplies
Instructions
Contributor
Want to have some creative family time? Print out our SudBudz® Masks and get crafty with the kiddos! More than just a typical Fizzy Bath Ball, SudPrize® is a first ever line of skin-loving and natural bath products that make bath time Fun for Kids and Easy for Moms. A Free companion App, SudBudz® engages your children into an immersive world of special and unique characters called SudBudz®.
0 thoughts on “Printable Roman Helmets”