


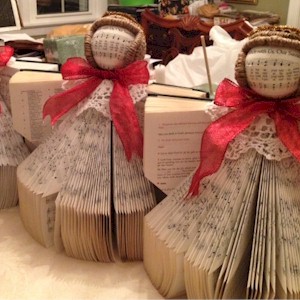
How To Make An Angel From A Recycled Hymnal
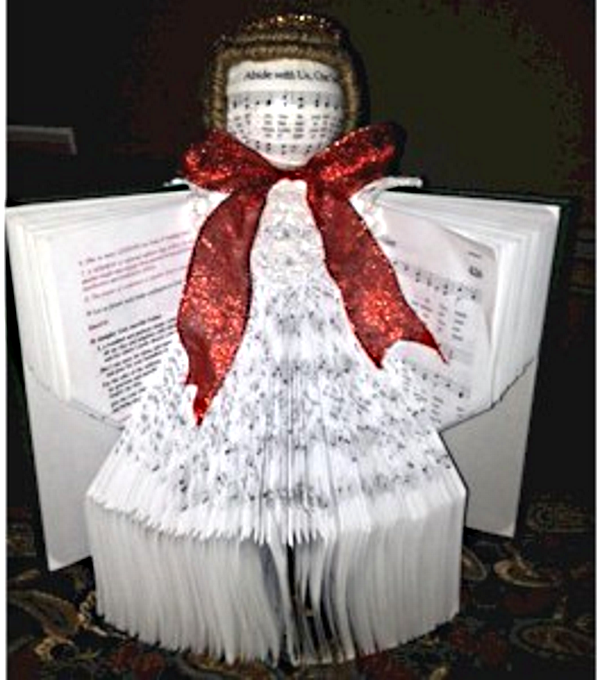
Congregation volunteer Jean Forberg made 85 of these beautiful angels for our church’s 50th Anniversary. If you are impressed by that number, you will be even more impressed with the detailed instructions she provided so you can make one to enjoy for Christmas. For your reference we have posted some photos below to show the project in progress. We are definitely making Jean an honorary member of the FreeKidsCrafts team.
Trivia:
Martin Luther set his musician’s heart to the task of providing a new song for the people to sing. In 1524, the first Lutheran hymnal, the so-called Achtliederbuch (Book of Eight Songs), rolled off the printing presses. Source: Christian Worship – Preview-Hymns
Supplies
- Hymnal
- Calculator
- 4″ Styrofoam Ball (of good quality Styrofoam)
- Modge Podge (I used modge podge with a matte finish)
- Wax Paper
- Foam Craft Brush
- Scissors
- 1/4″ dowel (three foot long or longer, if possible)
- Vaseline (or A & D Ointment) (This helps the jute to NOT stick to the dowel)
- Scott Towels
- Jute (not too thick / not too thin and in a color that you like)
- Tin Foil
- White Elmer’s Glue
- Tap Water (Warm or Room Temperature)
- Small Bowl
- Large Paper Clips
- Hot Glue Gun
- Hot Glue Gun Glue Sticks (and lots of them)
- A 12″ Piece of Dowel
- Something to hold the Dowel upright in position (I used a big square block of Styrofoam)
- Wire Ribbon (in the color / design of your choice) (approx. 30″-32″ in length per angel
- Floral Wire (try to get the same color / similar color to the ribbon color)
- 6″ Doily — White (or Off-White) in color
- Gold Craft / Decorate Pipe-Cleaner
- Dowels (1/4 inch in diameter) lengths (multiple dowels to make the hair/ also reused for the holding of the head in the assembled hymnals)
Instructions
- Locate an unused hymnal that is in good condition (its spine, the exterior of the hymnal, as well as the condition of the pages, etc…)
- Next, identify the name of the hymn that you would like to ultimately use for the face of the angel. Carefully remove the hymn page from the hymnal by carefully pulling on the page, being careful not to rip it, while pulling the page out as close to the “spine” as possible. Place the hymn page aside.
- To Fold the Angel’s Pages Into the Angel’s Dress:
Items Needed for this Portion:
Hymnal
Calculator - Now you need to do some page counting and some math for this project, sorry!Count the number of pages that can be folded into the actual angel. Do NOT include any “cardboard/ heavier cardstock pages” in the front / back of the hymnal.Once you get the total number of pages:
Divide the quantity by four. As ideally, you will take a grouping of four pages and folding them together to make one “four-page fold” of the angels wings or skirt.Once you get that number, you need to figure out what 21% of that number is, as well as what 58% of that number is. The reason for this is that 21% of the four-page folds will serve as the angels wing in the front of the hymnal, 21% of the four-page folds will serve as the angels wings in the back of the hymnal, and the remaining 58% of the four-page folds will serve as the angel’s gown in the center portion of the hymnal, allowing it to actually stand up!If your math does not actually come out perfectly, no worries, one, two or three “four-page folds” may have to actually have only three pages in it… no problem. No one is counting except you!
- Now, to start folding the pages of the hymnal…
Start with the first four pages that you will be folding in the front of the hymnal. Holding the hymnal like a regular book in front of you, as if you would be reading it, get the four pages in your fingers, and fold the four pages as ONE GROUPING from the bottom right of the page up and to the left. Be consistent with the vertical positioning of the pages so that the fold of the four-page grouping is consistent with its positioning as well. Keep in mind that you will only be folding the pages about half-way up, as the edge of the bottom of the pages (when in a “normal position” – like when you are reading a book) will actually be paralleling the spine of the hymnal
Continue folding the pages until you have reached the quantity that you have identified as 21% of the four-page folds. - Once completed with the front section, now turn your attention to the BACK of the hymnal.Again, holding the hymnal like a regular book in front of you, take the first grouping of the four-page groups and take the bottom of the four-page grouping and bring up from the bottom left up and to the right… bringing that bottom left hand corner to the spine mid-way up the back of the book. Be consistent with how far up you bring the pages, to make sure that the folds that you are creating are consistent in their position / appearance.
Continue to fold the pages until you achieve the 21% of the total number of four-page groupings. - Now that you have the angels wings done, start folding the angel’s gown which is in the center of the hymnal’s pages. This will take up 58% of the total quantity of the four-page groupings that you had done the math on…. If not all groupings can have four pages – maybe you’ll have to make two or three with just three pages in each… that’s ok…no one is counting but you.For the angel’s gown, I folded half of the “four-page” groupings toward the front of the hymnal, and the other half of the “four-page groupings” toward the back of the hymnal… so…
Take the first grouping of four-pages that have yet to be folded and which are closest to the BACK of the book, and fold this four-page grouping from the top of the left-hand corner down to the right… Fold the page and make the fold nice and crisp. Continue to fold pages consistently being uniform with just how closely you are folding to the spine area – making the gown’s folds consistent with the positioning. Continue to fold four-page groupings until you have folded half of the pages in this area. - Now, start to fold pages for the angel’s gown from the FRONT portion of the hymnal. Take the first four-page grouping from the first four pages that have remained unfolded and positioned immediately after the last of the four-page groupings that were folded for the angel’s “front” wings. Fold the “four-page grouping” from the top right hand-corner of the pages down and to the center of the page and close to the spine/binding. Make the fold that is made nice and crisp. Be consistent with just how close you fold the pages down, so that the folds of the groupings remain consistent with their “elevation”.
- To Make the Angel’s Face:
Items Needed for this Portion:
4″ Styrofoam Ball (of good quality Styrofoam)
Modge Podge (I used modge podge with a matte finish)
Wax Paper
Foam Craft Brush
Scissors - Cut the hymn page down by reducing the length by at least 3 inches.
Do a “dry run” and try to position the hymn sheet onto the Styrofoam ball — you may want to cut more off… Be certain to keep the hymn title!! - Brush a thin coat of modge podge on the back of the hymn page that you want to use for the face.
- Hold the Styrofoam ball in one of your hands.Coat at least a good amount of the ball with a good coating of modge podge.
Position the hymn page onto the Styrofoam ball and by gentle pushing and repositioning the hymn sheet, you cover the ball with the hymn sheet.
You may need to add more modge podge to the surface of the ball or to the surface of the hymn sheet so you can easily position and reposition the hymn sheet.DO NOT let your finger tips get “drier” – as they will then start to become tacky and then possible damage the hymn sheet by getting stuck to it.Make sure that you have folds that are not too large, no creases in bad areas that are a part of the “face” of the angel…
Place the completed head onto a small piece of wax paper to dry completely. - To Make the Angel’s Hair:
Items Needed for this Portion:
1/4″ dowel (three foot long or longer, if possible)
Vaseline (or A & D Ointment) (This helps the jute to NOT stick to the dowel)
Scott Towels
Jute (not too thick / not too thin and in a color that you like)
Scissors
Tin Foil
White Elmer’s Glue
Tap Water (Warm or Room Temperature)
Small Bowl
Foam Craft Brush
Large Paper Clips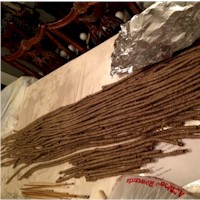
- Place a long length of tin foil on a table (to match the length of the dowels plus a few inches)
- Using a paper towel, place a nice coat of Vaseline (or A & D Ointment) over several inches of the length of the dowel.
- Wrap jute around the dowel by consistently just turning the dowel and having the jute wrap semi-tightly around the dowel. (You do NOT want to make it too loose – and you don’t want to make it too tight onto the dowel).
- Attach the starting end of the dowel with a paperclip to the dowel.Continue to wrap the dowel with the jute.
When needed, apply several more inches of the Vaseline to the surface of the dowel.
Continue to wrap the jute around the dowel until you reach the end. Fold it back onto itself and then attach the paperclip to hold the end of the jute in place. - Continue to wrap additional dowels as needed.
I found that I needed approx 1 3/4 yards of curled jute to make one head of hair. - Now…
Mix approx. 3 parts White Glue to one part water in a bowl with a foam craft brush. (you can adjust this proportion as you see fit.)
After you apply the glue/water mixture with the foam brush onto the jute-covered dowel, the mixture should NOT make the jute white or too milky white in color. If it does, then you need to add more water to the glue/water mixture.)You must apply a good coat onto the jute and really get it wet!
Let the dowels dry on the tin foil.
(I found that my dowels took approximately 24 – 36 hours to dry). - Once the dowels are dry, then…
Remove the paperclip from both ends.
Gently wrap your hand around a few inches of the jute and slide the jute over the end of the dowel.Continue to gently wrap your hand over the next few inches of the wrapped dowel, and slide that section down and closer to the end of the dowel…. repeat over and over to move the jute down toward and end – and then ultimately off of the dowel – making sure to retain the curl in the jute!! That’s important !!Take all hair strands that are made and lay them out onto a long table for safe keeping. - To Attach the Dried Curled Hair onto The Head:
Items Needed for this Portion:
Scissors
Hot Glue Gun
Hot Glue Gun Glue Sticks (and lots of them)
A 12″ Piece of Dowel
Something to hold the Dowel upright in position
(I used a big square block of Styrofoam)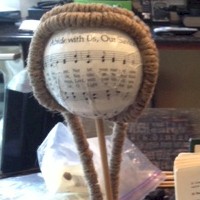
- Place the dowel in the item that it holding it upright.Place the Styrofoam head (that has already been modge-podged with the hymn page onto it) onto the dowel. You may need the tip of the scissors to start the hole in the Styrofoam ball, as some of the hymn page may be covering where you would like the dowel to go.
The hole that you use for the positioning of the dowel for this portion of the project will also be the positioning of the head when you assemble it with the hymnal. Be mindful of the head not looking “too” upward or too “downward”. - Once the head is positioned onto the dowel, then you can start to hot glue on the hair (curled jute).
Start with the first row of hair that make the row of “bangs” above the hymn title.Place a row of hot glue where you would like the hair to be positioned, going a little longer on each side vs. the hymn title length (or as long as you feel it should go for the length of your forehead)… Take an 18″ or so length of jute and center the length over the hot glue ad position the hair on this line of glue… squeeze the curls of the jute side by side so as to make a seamless appearance of the curls….
- To make the “side-burns”, place some hot glue where you would like it… maybe a little curved, down the side of the angel’s face, and then place the hair into position.Do the other side of the safe / side-burns…. and then go down as if you were going low on their head / neck to the back.If you find that the length of the curled piece of the jute is too short – no problem, just stat using another strand and glue that into place where the other left off.Continue…
Make a second row of the hair to mirror the first row that you had just glued on. - After those two rows are on the head, then I made one row of the hair to go from the center of the angel’s forehead to the center of the bottom of the angel’s head at it’s neck.I then continued to make “stripes” of the hair in this fashion working outward from the centered stripe to as far as I could go to where there side-burns were.Before placing the stripe of hot glue onto the head, I “dry-fitted” each length of hair for the space where it would be glued and cut it from the longer strand of the hair — I found that it was easier to handle, and helped avoid getting hot glue on any other hair…I found it easier to place a stripe of the glue on the Styrofoam head and then place the dry-fitted piece of hair strand onto it… making sure that the jute curls were right next to each other to make a tight row of hair.
- For the Making of the Bow:
Items Needed for this Portion:
Wire Ribbon (in the color / design of your choice) (approx. 30″-32″ in length per angel)
Floral Wire (try to get the same color / similar color to the ribbon color)
Scissors - Cut approx. 30 – 32″ of ribbon for each bow. (or just make one and see what length YOU would like for it to be… — THEN mass produce the length as needed from the ribbon roll).Make a bow like normal.
- Cut a length of the floral wire to approx. 9 or 10 inches long.
Run the wire underneath the ribbon’s knot on the side of the ribbon that you will NOT have facing outward.Twist the ribbon once or twice right at the knot to ensure that the wire stays attached well.Place this ribbon and wire combination aside. - Doily:
Items Needed for this Portion:
White / Off-White 6″ Doily — I purchased the white doily off of the Internet from a companylisted on Amazon.com.
The average cost of a doily that is made of white cotton (as of July, 2013) was approximately $1.50. (plus tax and shipping). - Halo:
Items Needed for this Portion:
Gold Craft / Decorate Pipe-Cleaner (The ones I used were approx. 12″-14″ long).
NOTE: I purchased these pipe cleaners in Michaels / A.C. Moore Craft Stores.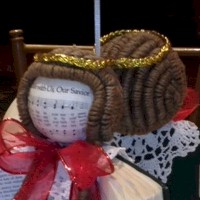
- I used two (2) gold pipe-cleaners together and just twisted them around each other to make the presence of the pipe-cleaner more substantial.Once the two pipe-cleaners were twisted around each other, then you can criss-cross them approximately 1.5″ from the end and then twist them together, and making then in to the shape of a circle — for the halo.
Set aside. - To Assemble the Hymnal Angel Together and Attachment of the Halo:
Items Needed for This Portion:
The hymnal (with the pages already folded)
The head (with the face modge-podged and the hair attached already)
A bow (with the wire attached)
A Doily
The Halo
A Length of Dowel (longer than the height of the book plus about 3 inches or so…)
A Hot Glue Gun
Hot Glue Gun Glue Sticks
Scissors - Place the hymnal in front of you on a table, upright.Using the dowel, insert the dowel into the base of the angel’s head — adjusting as needed so it is at the correct / desired angle, and complete a “dry-fit” into the books spine.If the length of the dowel with the head on it sticks up too far from the top of the books spine, then use the scissors and cut the dowel as needed.The bottom of the angel’s head (with the bow and doily) should be resting on the top of the hymnal’s spine… there should be no “air” / “space” between the top of the hymnal and the bottom of the angel’s head.
Once you are “good with the “dry-fit” of the head on the dowel… remove the dowel and head from the book…. push the book aside for a minute…
Place some hot glue into the hole in the head and reinsert the dowel into the hole.Let that dry for a minute or two.
- Now…
Right underneath the angel’s head, wire the bow around the dowel (making certain to attach the bow tightly to the dowel.). You may need to cut the wires if they are too long… or you can’t coil them up onto themselves…
Next, take a doily, and place the bottom of the dowel through the center hole of the doily… push the doily up the dowel and have it placed right under the bow. - Now…
Place the dowel (with the head, bow and the doily on it) into the top of the hymnal’s spine area. Complete yet another “dry fit”…. remove and then place hot glue on the portion of the dowel that will be able to be pressed up against the spine of the hymnal when it is inserted. Hold the hot-glued dowel into place pushing it against the spine so that it has a firm hold and dries in place correctly. - The last thing that I did was attach the halo onto the angel’s head.
Place the assembled hymnal angel in from of you. Take the halo and place four dots / or one-inch length of hot glue on the underside of the halo and then position the halo onto the angel’s head where you would like for it to rest. (I made certain that I did not place “glue dots” on the portion of the halo that faced the front of the angel’s head). Do NOT use too much glue – don’t want “overflow” glue to be seen! - You can complete the project with the placement of a sticker / stamp on the inside of the cover or on the inside of the cover page so that your special event / dedication can be seen when the angel is looked at by people.
Congratulations !!
You have completed a Hymnal Angel !!
BE AN ANGEL — MAKE AN ANGEL — GIVE AN ANGEL !!
![]()


Supplies
Instructions
Other Images
Click on an image to open it in a new window
Contributor

These projects are created by Terri, Betty, Jamie or one of the talented staff members at MakingFriends.com. They have been created exclusively for publication on FreeKidsCrafts.com with supplies you'll be able to find around your house.
First, I am not a fan of destroying books, especially ones that teach good. Many churches perhaps do not use hymnals today but they were very important in teaching Christian principals. If churches in America choose not to use hymnals there are uses for them in other churches elsewhere. They could be donated to Christian minustries . I am not a fan of this craft, but I do appreciate your website. Thank you for providing it.
I can appreciate your thoughts and agree. We did donate many of the hymnals to other churches.
Jean, God gave you the skills and truly the patience to make these beautiful Hymnal Angels for your church. I am sure that those who received these angels not only appreciate the angel design but also the music that is contained within them. Thank you and God bless you!