


Origami Kitty Craft
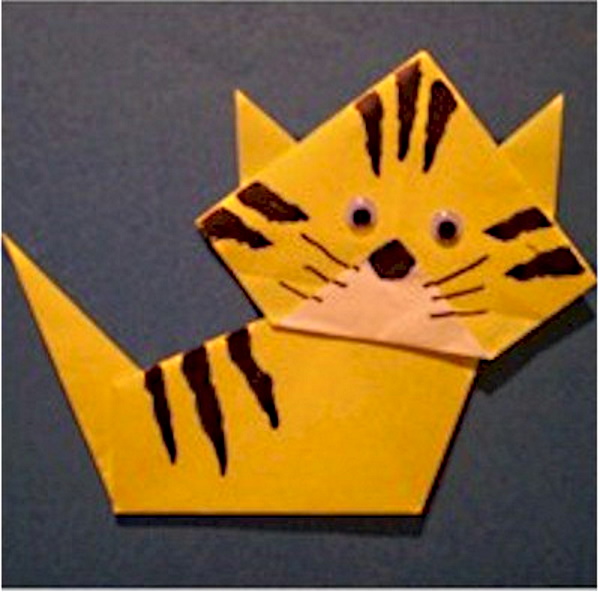
Make this friendly little Origami Kitty designed by the FreeKidsCrafts Team and add your own markings to make it your own. We gave ours little tiger stripes.
Supplies
- Two sheets of square paper
- Markers (optional)
- Wiggle Eyes (optional)
Instructions
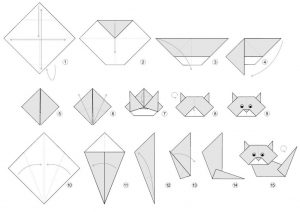
- Fold and crease paper diagonally in both directions. Open up. Fold top oit down to first crease. Fold bottom point up toward the back about one quarter of the way to the middle.Crease
- Fold in half. Crease
- Fold the left point to the middle. Crease.
- Fold the right point to the middle. Crease. Diagram shows how model will look at this stage.
- Fold both bottom tips up at a slight angle to form ears. Crease well.
- Fold top corner point down. Crease well
- Turn over. Fold tip of middle point down to form nose.
- Draw on eyes or add wiggle eyes.
- Fold second piece in half diagonally. Open up. fold both side corners to middle crease.
- Fold in half.
- Fold bottom corner up. Crease well. Diagram shows how model will look at this stage
- Turn. Open up head and glue inside.
If you would like, take a marker and create special markings and glue on wiggle eyes for your own personal kitty.
Patterns, Templates and Printables
Click on a pattern to open it in a new window to print
![]()


Supplies
Two sheets of square paper
Markers (optional)
Instructions
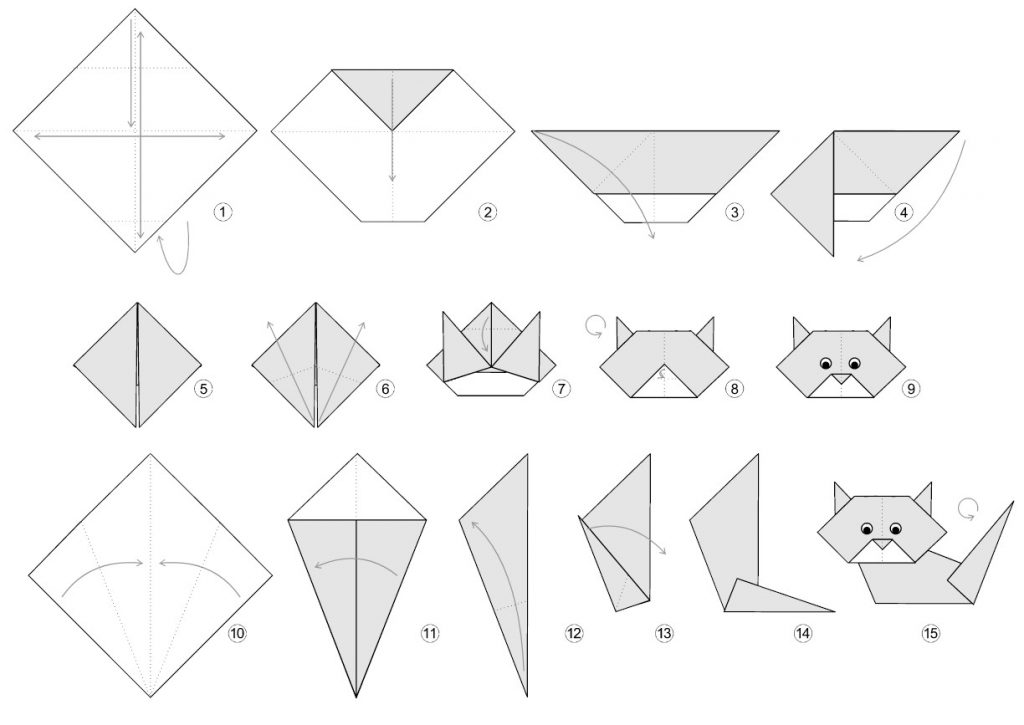
Fold and crese paper diagonally in both directions. Open up. Fold top oit down to first crease. Fold bottom point up toward the back about one quarter of the way to the middle.Crease
Fold in half. Crease
Fold the left point to the middle. Crease.
Fold the right point to the middle. Crease.
Diagramshows how model will look at this stage.
Fold both bottom tips up at a slight angle to form ears. Crease well.
Fold top corner point down. Crease well
Turn over. Fold tip of middle point down to form nose.
Draw on eyes or add wiggle eyes.
Fold second piece in half diagonally. Open up. fold both side corners to middle crease.
Fold in half.
Fold bottom corner up. Crease well.
Diagram shows how model will look at this stage.
Turn. Open up head and glue inside.
If you would like, take a marker and create special markings for your own personal kitty.
Patterns, Templates and Printables
Click on a pattern to open it in a new window
Contributor
Want to have some creative family time? Print out our SudBudz® Masks and get crafty with the kiddos! More than just a typical Fizzy Bath Ball, SudPrize® is a first ever line of skin-loving and natural bath products that make bath time Fun for Kids and Easy for Moms. A Free companion App, SudBudz® engages your children into an immersive world of special and unique characters called SudBudz®.
Tags kitten crafts
0 thoughts on “Origami Kitty Craft”