


Pop-Up Chanukah Menorah
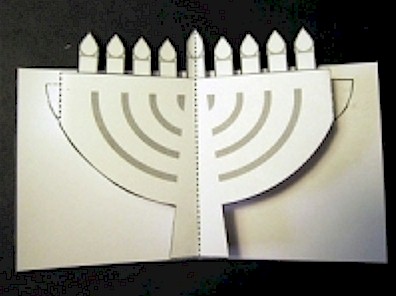
Chanukah is the season of light and what is better to make than a Pop-Up Chanukah Menorah! This beautiful pop-up menorah may be too difficult for younger children but older siblings can create this delightful card for grandparents and special family members and friends.
Trivia: Jews around the world light Hanukkah menorahs during Hanukkah, but in Israel the festival’s flame takes an interesting path. Embracing a custom long associated with the Olympics, runners race a burning torch from the Israeli city of Modiin to Jerusalem, a distance of about 20 miles (32 km), where the chief rabbi lights a giant menorah at the Western Wall. The practice is now duplicated in other Jewish communities around the world. Source: Time – Top 10 Things You Didn’t Know About Hanukkah
Supplies
- White Card Stock or Construction Paper
- Sharp Scissors
- White glue (such as elmer’s)
- Ruler
- Paperclip or ballpoint pen that has run out of ink
Instructions
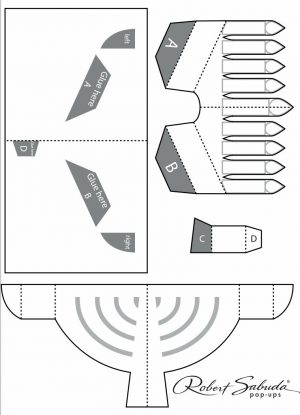
- Click on the patterns below to print.
- Print out page from the template onto heavy paper, such as card stock or construction paper.
- If you want to add color to your pop-up Chanukah menorah, it’s easier to color in and/or decorate your pop-up pieces before you cut them out!
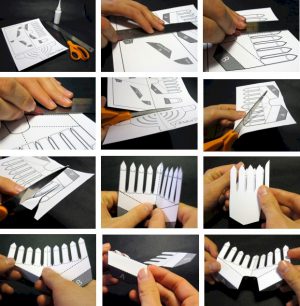
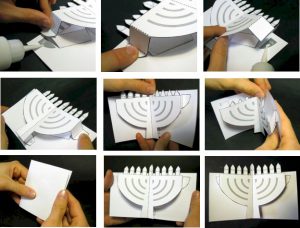
- Using a ruler as a guide, take the rounded end of a paper clip (or ballpoint pen that has run out of ink) and press along the dotted line of the pop-up card. Continue scoring on all the dotted lines for the pieces as well. Make sure you score the diagonal fold lines on the candle piece as well
- Carefully cut out all the pieces along the solid black lines. Make sure you cut out the areas in between the candles as shown.
- Fold the candle piece in half along the middle dotted line, so that the lines are on the inside. Crease along the middle “shamash” candle all the way up to the top.
- Fold the bottom-left side of the candle piece down along the angled dotted line.
- Fold the tab marked “A” back along the dotted line.
- Repeat Steps 7 and 8 on the right side. Set this piece aside for a moment.
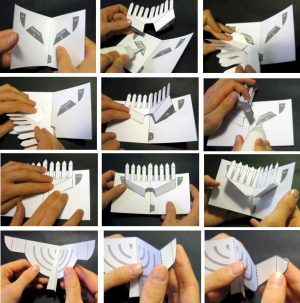
- Take the card and fold it in half.
- Put a small amount of glue on the area of the card marked “Glue here A”.
- Glue Tab “A” FACE DOWN to the matching area on the card.
- Press down firmly and allow time for the glue to dry.
- Fold the candle piece to face upwards. The middle fold should line up with the fold of the card
- Put a small amount of glue on the area marked “Glue here B”.
- Press tab B down to the matching area on the card and press firmly, allowing time for the glue to dry. The candles should move forward and downward as the card is closed
- Close the card carefully, making sure that the candles fold correctly.
- Take the Menorah piece and fold it in half inwards.
- Fold the left side of the Menorah back along the dotted line.
- Fold the small tab on the left side forward, along the dotted line.
- Fold the right side of the Menorah back along the dotted line.
- Fold the small tab on the right side forward, along the dotted line.
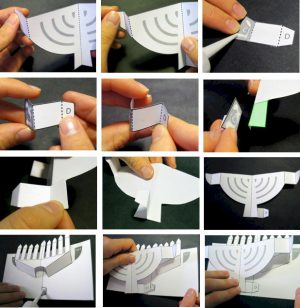
- Find the small piece with Tabs C and D. Fold C back and D forward, so that the piece forms a “Z” shape. Put a small amount of glue on the Tab marked “C”. With the glue on the “C” tab, fold the tab back and prepare to glue it to the back of the Menorah.
- Turn the Menorah face down, and glue Tab C FACE DOWN to the bottom-right side of the Menorah’s foot. See the area highlighted in the picture.
- Hold the tab firmly in place and allow time for the glue to dry. Note that the tab glued inn place lines up with the center fold of the Menorah.
- Turn the Menorah over and prepare to attach it to the card.
- Apply a small amount of glue to the base page in the area marked “Glue here D”.
- Line up the tab marked “D” with the matching area on the card. Press firmly and allow the glue time to dry.
- Apply a small amount of glue in the area that matches the left tab of the Menorah. Press down firmly and allow time for the glue to dry.
- Apply a small amount of glue in the area that matches the left tab of the Menorah.
- Press down firmly and allow time for the glue to dry. Make sure the candles tuck down inside as you close the card. They should hide inside as the card is closed.
- Close the card all the way. And open it back up again – your card is complete! Happy Chanukah!
Other Images
Patterns, Templates and Printables
Click on a pattern to open it in a new window to print
Contributor
![]()
Robert Sabuda
Robert works in his studio in New York City that he shares with his partner, children’s book creator Matthew Reinhart. When asked about his work, Robert says, “We love making books. It’s hard work but the best part is not having to worry about making a mess. When being an artist is your job, you can make as many messes as you want to!”
Supplies
Instructions
Contributor
Want to have some creative family time? Print out our SudBudz® Masks and get crafty with the kiddos! More than just a typical Fizzy Bath Ball, SudPrize® is a first ever line of skin-loving and natural bath products that make bath time Fun for Kids and Easy for Moms. A Free companion App, SudBudz® engages your children into an immersive world of special and unique characters called SudBudz®.
0 thoughts on “Pop-Up Chanukah Menorah”